CentOS 7 EE CPU Installation With Tarball
| Note | MapD has been rebranded to OmniSci. |
This is an end-to-end recipe for installing OmniSci Enterprise Edition on a CentOS 7 machine using a tarball.
Here is a quick video overview of the installation process.
- The installation phases are:
| Important | The order of these instructions is significant. To avoid problems, install each component in the order presented. |
Assumptions
- These instructions assume the following:
- You are installing on a “clean” CentOS 7 host machine with only the operating system installed.
- Your OmniSci host only runs the daemons and services required to support OmniSci.
- Your OmniSci host is connected to the Internet.
Preparation
Prepare your Centos 7 machine by installing JDK, EPEL, and CUDA, and enabling a firewall.
JDK
Follow these instructions to install a headless JDK and configure an environment variable with a path to the library. The “headless” Java Development Kit does not provide support for keyboard, mouse, or display systems. It has fewer dependencies, and is best suited for a server host. For more information, see http://openjdk.java.net/.
Open a terminal on the host machine.
Install the headless JDK using the following command:
sudo yum install java-1.8.0-openjdk-headless
Update and Reboot
Update the entire system and reboot to activate the latest kernel.
sudo yum update
sudo reboot
Create the OmniSci User
Create a group called mapd and a user named mapd, who will be the owner of the OmniSci database. You can create both the group and user with the useradd command and the -U switch.
sudo useradd -U mapd
Firewall
To use Immerse, you must prepare your host machine to accept HTTP connections. You can configure your firewall for external access.
sudo firewall-cmd --zone=public --add-port=9092/tcp --permanent
sudo firewall-cmd --reload
For more information, see https://fedoraproject.org/wiki/Firewalld?rd=FirewallD.
Installation
You install the OmniSci application itself by expanding a TAR file.
Create your
$MAPD_PATHdirectory. OmniSci recommends/opt/mapd.Expand the OmniSci archive file in the $MAPD_PATH directory with the following command.
tar -xvf <file_name>.tar.gz
Configuration
These are the steps to prepare your OmniSci environment.
Create the mapd User
Use the following command to create the mapd user. The -U switch also creates the mapd group.
sudo useradd -U mapd
Set Environment Variables
For convenience, you can update .bashrc with the required environment variables.
- Open a terminal window.
- Enter
cd ~/to go to your home directory. - Open
.bashrcin a text editor. For example,sudo gedit .bashrc. - Edit the
.bashrcfile. Add the following export commands under “User specific aliases and functions.”# User specific aliases and functions export MAPD_USER=mapd export MAPD_GROUP=mapd export MAPD_STORAGE=/var/lib/mapd export MAPD_PATH=/opt/mapd export MAPD_LOG=/var/lib/mapd/data/mapd_log
- Save the
.bashrcfile. - Open a new terminal window to use your changes.
The $MAPD_STORAGE directory must be dedicated to OmniSci: do not set it to a directory shared by other packages.
OmniSci Configuration File (mapd.conf)
You can also create a configuration file with optional settings. See Configuration.
Initialization
This step initializes the database and prepares systemd commands for OmniSci.
Run the
systemdinstaller. This script requiressudoaccess. You might be prompted for a password. Accept the values provided (based on your environment variables) or make changes as needed. The script creates a data directory in $MAPD_STORAGE with the directoriesmapd_catalogs,mapd_data, andmapd_export.mapd_importandmapd_logdirectories are created when you insert data the first time. Themapd_logdirectory is the one of most interest to a OmniSci administrator.cd $MAPD_PATH/systemd ./install_mapd_systemd.sh
Activation
Start and use OmniSci Core and Immerse.
Start OmniSci Core
sudo systemctl start mapd_server
sudo systemctl start mapd_web_server
Enable OmniSci Core to start when the system reboots.
sudo systemctl enable mapd_server
sudo systemctl enable mapd_web_server
Checkpoint
To verify that all systems are go, load some sample data, perform a mapdql query, and generate a Table chart using Immerse.
OmniSci ships with two sample datasets of airline flight information collected in 2008. To install the sample data, run the following command.
cd $MAPD_PATH
./insert_sample_data
When prompted, choose whether to insert dataset 1 (7 million rows) or dataset 2 (10 thousand rows).
Enter dataset number to download, or 'q' to quit:
#     Dataset           Rows    Table Name          File Name
1)    Flights (2008)    7M      flights_2008_7M     flights_2008_7M.tar.gz
2)    Flights (2008)    10k     flights_2008_10k    flights_2008_10k.tar.gz
Connect to OmniSci Core by entering the following command in a terminal on the host machine (default password is HyperInteractive):
$MAPD_PATH/bin/mapdql
password: ••••••••••••••••
Enter a SQL query such as the following:
mapdql> SELECT origin_city AS "Origin", dest_city AS "Destination", AVG(airtime) AS
"Average Airtime" FROM flights_2008_10k WHERE distance < 175 GROUP BY origin_city,
dest_city;
Your results should be similar to the results below.
Origin|Destination|Average Airtime
Austin|Houston|33.055556
Norfolk|Baltimore|36.071429
Ft. Myers|Orlando|28.666667
Orlando|Ft. Myers|32.583333
Houston|Austin|29.611111
Baltimore|Norfolk|31.714286
Connect to Immerse using a web browser connected to your host machine on port 9092. For example, http://omnisci.mycompany.com:9092.
Create a new dashboard and a Table chart.
- Click New Dashboard.
- Click Add Chart. Table is the default chart type.
- Click Add Data Source.
- Choose the flights_2008_10k table as the datasource.
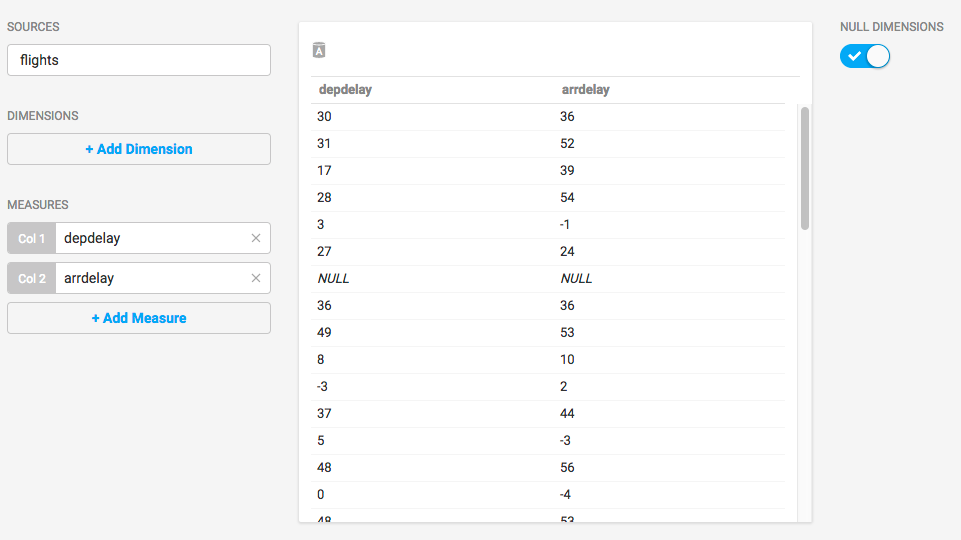
- Click Add Measure.
- Choose depdelay.
- Click Add Measure.
- Choose arrdelay.
The resulting chart shows, unsurprisingly, that there is a correlation between departure delay and arrival delay.