Jupyter Integration
Installing Jupyter with OmniSciDB
- Install the Nvidia drivers and nvidia-docker per the instructions at https://github.com/NVIDIA/nvidia-docker for your operating system.
- For Apt-based installations such as Ubuntu, you can use the Docker preparation instructions.
- Change the default Docker runtime to
nvidiaand restart Docker.- Edit
/etc/docker/daemon.json. - Add
"default-runtime": "nvidia"to the JSON file. - Here is a sample of the resulting file:
{ "default-runtime": "nvidia", "runtimes": { "nvidia": { "path": "nvidia-container-runtime", "runtimeArgs": [] } } } - Restart the docker service. (for example,
sudo systemctl restart docker) - Validate nvidia docker:
docker run --rm nvidia/cuda:9.2-runtime-ubuntu16.04 nvidia-smi
- Edit
- Install
docker-composeversion 1.24 or higher.sudo curl -L https://github.com/docker/compose/releases/download/1.24.1/docker-compose-`uname -s`-`uname -m` -o /usr/local/bin/docker-compose sudo chmod +x /usr/local/bin/docker-compose
- Create an OmniSci storage directory and cd to it (you may use a different directory of your choice):
sudo mkdir /var/lib/omnisci
cd /var/lib/omnisci
- Create the file
/var/lib/omnisci/omnisci.conf. Configure thejupyter-urlsetting under the[web]section to point to the Jupyter service:[web] jupyter-url = "http://jupyterhub:8000" servers-json = "/omnisci-storage/servers.json"
- Create the file
/var/lib/omnisci/data/omnisci.license. Copy your license key from the registration email message.
If you have not received your license key, contact your Sales Representative or register for your 30-day trial here. - Create the
/var/lib/omnisci/servers.jsonentry that enables Jupyter features in Immerse. Change$HOSTNAMEto the hostname used to to access Immerse, if it is not the current machine hostname, or omit that line.[ { "database": "omnisci", "host": "$HOSTNAME", "enableJupyter": true } ] - Create
/var/lib/omnisci/docker-compose.yml:version: '3.7' services: omnisciserver: container_name: omnisciserver image: omnisci/omnisci-ee-cuda:v4.8.0 restart: always ipc: shareable volumes: - /var/lib/omnisci:/omnisci-storage - /var/lib/omnisci/data/mapd_import/jhub_omnisci_dropbox:/jhub_omnisci_dropbox networks: - omnisci-frontend - omnisci-backend ports: - "6273:6273" - "6274:6274" - "6278:6278" # If using binary encrytion, uncomment the below line to override the default command that uses startomnisci, # noting that you must have an existing OmniSci data directory and run initdb before making this change. # command: /bin/bash -c "/omnisci/bin/omnisci_web_server --config /omnisci-storage/omnisci.conf & /omnisci/bin/omnisci_server --config /omnisci-storage/omnisci.conf" jupyterhub: container_name: jupyterhub image: omnisci/omnisci-jupyterhub:latest restart: always networks: - omnisci-backend depends_on: - omnisciserver volumes: - /var/run/docker.sock:/var/run/docker.sock # Map this volume if binary encryption mode is configured and certificates are being validated # - /var/lib/omnisci/cacerts.crt:/omnisci-storage/cacerts.crt environment: ### Required settings ### # Note: if changing the image, do not remove the &jlabimage anchor # The gpu image includes Rapids, requires GPU devices and nvidia docker runtime: DOCKER_JUPYTER_LAB_IMAGE: &jlabimage omnisci/omnisci-jupyterlab-gpu:latest # Without rapids does not require GPU: # DOCKER_JUPYTER_LAB_IMAGE: &jlabimage omnisci/omnisci-jupyterlab-cpu:latest OMNISCI_HOST: omnisciserver OMNISCI_JUPYTER_ROLE: omnisci_jupyter ### Optional settings ### # DOCKER_NOTEBOOK_DIR: /home/jovyan # The directory inside the user's Jupyter Lab container to mount the user volume to. # HUB_IP: jupyterhub # The hostname or IP of the Jupyter Hub server # JHUB_BASE_URL: /jupyter/ # The base URL prepended to all Jupyter Hub and Lab requests # JHUB_ENABLE_ADMIN_ACCESS: "false" # Enable / disable admin access to Jupyter Hub # JLAB_CONTAINER_AUTOREMOVE: "true" # Enable / disable automatic removal of stopped Juptyer Lab containers # JLAB_DOCKER_NETWORK_NAME: omnisci-backend # The docker network name for Jupyter Lab containers # JLAB_IDLE_TIMEOUT: 3600 # Shut down Jupyter Lab containers after this many seconds of idle time # JLAB_NAME_PREFIX: jupyterlab # Container name prefix for Lab containers # JLAB_OMNISCI_IMPORT_VOLUME_PATH: /var/lib/omnisci/data/omnisci_import/jhub_omnisci_dropbox # Local Docker host path for where to mount the shared directory available to the OmniSciDB server for file ingest # JLAB_NOTEBOOK_TERMINALS_ENBLED: "false" # Enable terminals in notebooks # JLAB_USER_VOLUME_PATH: /var/lib/omnisci/jupyter/ # Local Docker host path to be used for user Jupyter Lab home directory volume mapping # JUPYTER_DEBUG: "true" # Turn on / off debugging for Jupyter Hub and Lab # OMNISCI_BINARY_TLS_CACERTS_LOCAL_PATH: /var/lib/omnisci/cacerts.crt # Specifying this or mapping a volume in the Hub container to /omnisci-storage/cacerts.crt will automatically enable binary TLS mode # OMNISCI_BINARY_TLS_VALIDATE: "false" # Whether or not to validate certificates in binary TLS mode. Specifying either "true" or "false" will enable binary TLS mode # OMNISCI_PORT: 6278 # Port that Jupyter Hub should use to connect to OmniSci. Ensure this matches the protocol # OMNISCI_PROTOCOL: http # Protocol that Jupyter Hub should use to connect to OmniSci. Ensure this is "binary" if using binary encryption # OMNISCIDB_CONTAINER_NAME: omnisciserver # OmniSciDB container name for IPC sharing with Lab containers OMNISCI_ALLOW_SUPERUSER_ROLE: "true" # Authorize super users access to Jupyter without needing to be given the OmniSci role specified in OMNISCI_JUPYTER_ROLE # SPAWNER_CPU_LIMIT: 1 # Number of CPU cores available for each Jupyter Lab container, see https://jupyterhub.readthedocs.io/en/stable/api/spawner.html#jupyterhub.spawner.Spawner.cpu_limit # SPAWNER_RAM_LIMIT: 10G # Amount of CPU RAM available for each Jupyter Lab container, see https://jupyterhub.readthedocs.io/en/stable/api/spawner.html#jupyterhub.spawner.LocalProcessSpawner.mem_limit # SPAWNER_ENV_OMNISCI_HOST: omnisciserver # Hostname / IP address of the OmniSci server for Lab containers to connect to by default # SPAWNER_ENV_OMNISCI_PORT: 6274 # Port of the OmniSci server for Lab containers to connect to by default # SPAWNER_ENV_OMNISCI_PROTOCOL: binary # Protocol of the OmniSci server for Lab containers to connect to by default # OMNISCI_DB_URL: "omnisci://omnisciserver:6274/omnisci" # Alternative, direct connection (not Immerse session) to omnisciserver. Username will be inferred, but password will be required in notebook. # More volumes for lab containers: # JLAB_VOLUME_1: /data1:/data1:rw # JLAB_VOLUME_2: /var/lib/omnisci:/omnisci-storage:ro # The purpose of this is to make sure the jlabimage is pulled because jupyterhub will not pull it automatically when launching jupyterlab-tmp: image: *jlabimage command: echo networks: - omnisci-backend networks: omnisci-frontend: driver: bridge name: omnisci-frontend omnisci-backend: driver: bridge name: omnisci-backend - Run
sudo /usr/local/bin/docker-compose pullto download the images from Docker Hub. - Run
sudo /usr/local/bin/docker-compose up -d. This runs compose in detached mode, and restarts by default whenever stopped. - Log in as the super user (
admin/HyperInteractive) - Create required users in OmniSciDB.
- Create the omnisci_jupyter role in OmniSciDB:
CREATE ROLE omnisci_jupyter. - Grant the omnisci_jupyter role to users who require Jupyter access:
GRANT omnisci_jupyter TO username.
Adding Jupyter to an Existing OmniSciDB Instance
To use Jupyter with an existing, non-Dockerized install of OmniSci, first we will change OmniSci to run on Docker instead of the host. The steps are the same as the install instructions, with the following exceptions:
- Change the volume mappings highlighted in red to point to your existing installation path:
services:
omnisciserver: container_name: omnisciserver image: omnisci/omnisci-ee-cuda:v4.8.0 restart: always ipc: shareable volumes: - /var/lib/omnisci:/omnisci-storage - /var/lib/omnisci/data/mapd_import/jhub_omnisci_dropbox:/jhub_omnisci_dropbox - Enable the following environment variables and change the relevant paths,
highlighted in red, to your existing installation:
### Optional settings ### # DOCKER_NOTEBOOK_DIR: /home/jovyan # The directory inside the user's Jupyter Lab container to mount the user volume to. # HUB_IP: jupyterhub # The hostname or IP of the Jupyter Hub server # JHUB_BASE_URL: /jupyter/ # The base URL prepended to all Jupyter Hub and Lab requests # JHUB_ENABLE_ADMIN_ACCESS: "false" # Enable / disable admin access to Jupyter Hub # JLAB_DOCKER_NETWORK_NAME: omnisci-backend # The docker network name for Jupyter Lab containers # JLAB_IDLE_TIMEOUT: 3600 # Shut down Jupyter Lab containers after this many seconds of idle time # JLAB_NAME_PREFIX: jupyterlab # Container name prefix for Lab containers JLAB_OMNISCI_IMPORT_VOLUME_PATH: /var/lib/omnisci/data/omnisci_import/jhub_omnisci_dropbox # Local Docker host path for where to mount the shared directory available to the OmniSciDB server for file ingest # JLAB_NOTEBOOK_TERMINALS_ENBLED: "false" # Enable terminals in notebooks JLAB_USER_VOLUME_PATH: /var/lib/omnisci/jupyter/ # Local Docker host path to be used for user Jupyter Lab home directory volume mapping # JUPYTER_DEBUG: "true" # Turn on / off debugging for Jupyter Hub and Lab # OMNISCIDB_CONTAINER_NAME: omnisciserver # OmniSciDB container name for IPC sharing with Lab containers OMNISCI_ALLOW_SUPERUSER_ROLE: "true" # Authorize super users access to Jupyter without needing to be given the OmniSci role specified in OMNISCI_JUPYTER_ROLE # SPAWNER_CPU_LIMIT: 1 # Number of CPU cores available for each Jupyter Lab container, see https://jupyterhub.readthedocs.io/en/stable/api/spawner.html#jupyterhub.spawner.Spawner.cpu_limit # SPAWNER_RAM_LIMIT: 10G # Amount of CPU RAM available for each Jupyter Lab container, see https://jupyterhub.readthedocs.io/en/stable/api/spawner.html#jupyterhub.spawner.LocalProcessSpawner.mem_limit # SPAWNER_ENV_OMNISCI_HOST: omnisciserver # Hostname / IP address of the OmniSci server for Lab containers to connect to by default # SPAWNER_ENV_OMNISCI_PORT: 6274 # Port of the OmniSci server for Lab containers to connect to by default # SPAWNER_ENV_OMNISCI_PROTOCOL: binary # Protocol of the OmniSci server for Lab containers to connect to by default - If you have an existing omnisci.conf file, add the required sections
instead of creating a new file:
[web]
jupyter-url = "http://jupyterhub:8000"
servers-json = "/omnisci-storage/servers.json"
- Also in your existing omnisci.conf, remove properties data and frontend that should not be changed with a docker installation.
- If you have an existing servers.json file, move it to your OmniSci
home directory (default is /var/lib/omnisci) and add the following key/value
pair:
"enableJupyter": true
Important Before running docker-compose up -d, ensure that any existing installations are stopped and disabled. For example:sudo systemctl stop omnisci_server sudo systemctl stop omnisci_web_server sudo systemctl disable omnisci_server sudo systemctl disable omnisci_web_server
As with any software upgrade, it is important that you back up your data before you upgrade OmniSci.
Using Jupyter
Open Jupyterlab by clicking the Jupyter icon in the upper right corner of Immerse.
Jupyterlab opens in a new tab. You are signed in automatically using OmniSci authentication, with a notebook ready to start an OmniSci connection. The notebook is saved for you at the root of your Jupyter file system.
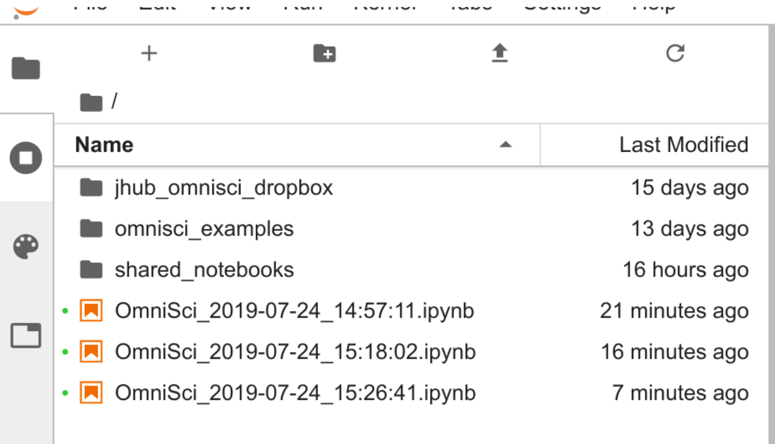
You can verify the location of your file by clicking the folder icon in the top left.
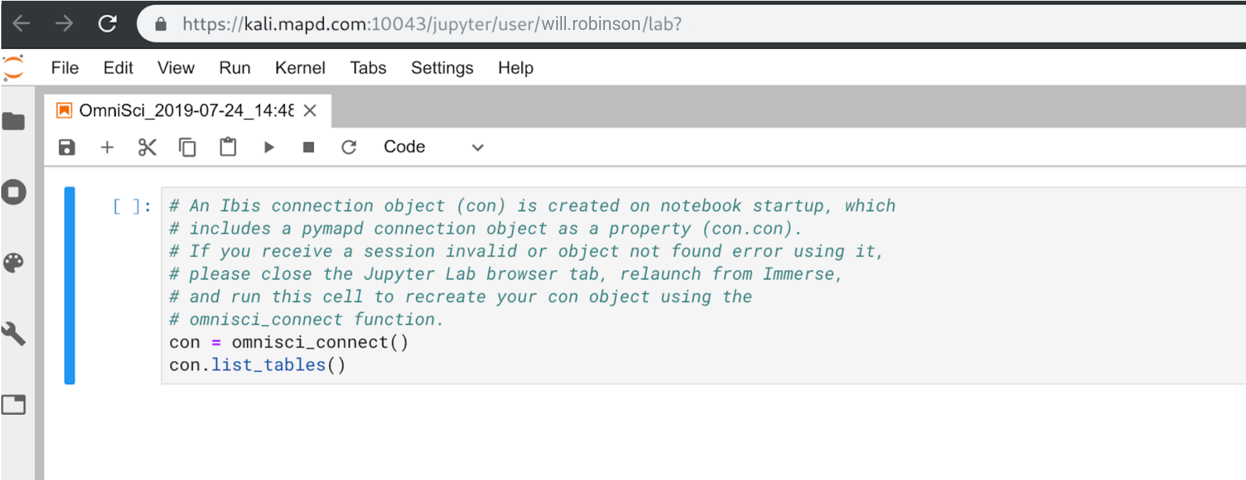
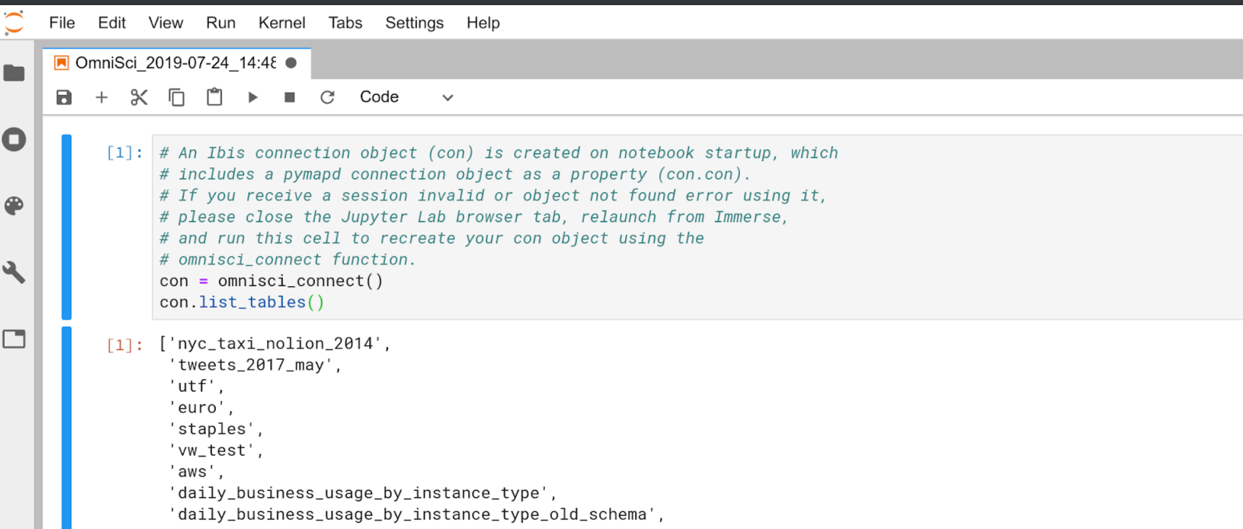
The contents of the cell are pre-filled with explanatory comments and the
omnisci_connect() method ready to set up your Omnisci connection
within Jupyter. Click the Play button to run the connection statement
and list the tables in your OmniSciDB instance.
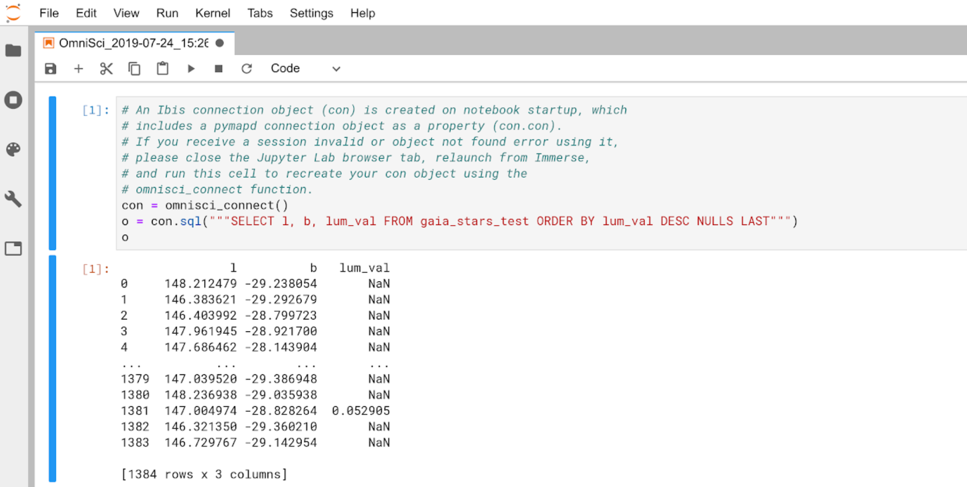
You can continue to use con to run more Ibis expressions in further cells.
The connection is set up to reuse the session already in use by Immerse (by passing Jupyter the raw session id). You do not need credentials to connect this way, but it means that the connection has a "time-to-live." After the session timeout period passes with no activity (60 minutes by default), the session is invalidated. You have to re-enter Jupyter from Immerse in the same way to re-establish the connection, or use the pymapd connect method to enter your credentials manually.
You can also launch Jupyter from the Immerse SQL Editor. After you run a query in the SQL Editor, a button appears that allows you to send your query to Jupyter.
The query displays in a different notebook, ready to run the query right away. You still must run the cell yourself to send the query and see the results.