Ubuntu CE CPU Installation With Apt
| Note | MapD has been rebranded to OmniSci. |
This is an end-to-end recipe for installing OmniSci Community Edition on an Ubuntu machine running without GPUs. This install has all of the functionality of OmniSci, except for backend rendering (Pointmap, Scatterplot, and other charts might not be available.)
Here is a quick video overview of the installation process.
- The installation phases are:
| Important | The order of these instructions is significant. To avoid problems, install each component in the order presented. |
Assumptions
- These instructions assume the following:
- You are installing on a “clean” Ubuntu host machine with only the operating system installed.
- Your OmniSci host only runs the daemons and services required to support OmniSci.
- Your OmniSci host is connected to the Internet.
Preparation
Prepare your Ubuntu machine by updating your system, creating the OmniSci user (named mapd), and enabling the firewall.
Update and Reboot
- Update the entire system.
sudo apt update
sudo apt upgrade
- Install a "headless" Java runtime environment.
sudo apt install default-jre-headless
- Verify that the
apt-transport-httpsutility is installed.sudo apt install apt-transport-https
- Reboot to activate the latest kernel.
sudo reboot
Create the OmniSci User
Create a group called mapd and a user named mapd, who will be the owner of the OmniSci database. You can create both the group and user with the useradd command and the -U switch.
sudo useradd -U mapd
Firewall
To use Immerse, you must prepare your host machine to accept HTTP connections. You can configure your firewall for external access.
sudo ufw disable
sudo ufw allow 9092/tcp
sudo ufw allow ssh
sudo ufw enable
For more information, see https://help.ubuntu.com/lts/serverguide/firewall.html.
Installation
- If necessary, install the
curlcommand.sudo apt install curl
- Use curl to download the OmniSci list file.
sudo curl https://releases.mapd.com/ce/mapd-ce-cpu.list | sudo tee /etc/apt/sources.list.d/mapd.list
- Download and add a GPG key to apt.
sudo curl https://releases.mapd.com/GPG-KEY-mapd | sudo apt-key add -
- Use
updateto locate the new installation options, then install OmniSci.sudo apt update sudo apt install mapd
Configuration
Follow these steps to prepare your OmniSci environment.
Set Environment Variables
For convenience, update .bashrc with the required environment variables.
- Open a terminal window.
- Enter
cd ~/to go to your home directory. - Open
.bashrcin a text editor. For example,sudo gedit .bashrc. - Edit the
.bashrcfile. Add the following export commands under “User specific aliases and functions.”# User specific aliases and functions export MAPD_USER=mapd export MAPD_GROUP=mapd export MAPD_STORAGE=/var/lib/mapd export MAPD_PATH=/opt/mapd export MAPD_LOG=/var/lib/mapd/data/mapd_log
- Save the
.bashrcfile. - Open a new terminal window to use your changes.
The $MAPD_STORAGE directory must be dedicated to OmniSci: do not set it to a directory shared by other packages.
Initialization
This step initializes the database and prepares systemd commands for OmniSci.
Run the
systemdinstaller. This script requiressudoaccess. You might be prompted for a password. Accept the values provided (based on your environment variables) or make changes as needed. The script creates a data directory in $MAPD_STORAGE with the directoriesmapd_catalogs,mapd_data, andmapd_export.mapd_importandmapd_logdirectories are created when you insert data the first time. Themapd_logdirectory is the one of most interest to a OmniSci administrator.cd $MAPD_PATH/systemd sudo ./install_mapd_systemd.sh
Activation
Start and use OmniSci Core and Immerse.
Start OmniSci Core
cd $MAPD_PATH
sudo systemctl start mapd_server
sudo systemctl start mapd_web_server
Enable OmniSci Core to start when the system reboots.
sudo systemctl enable mapd_server
sudo systemctl enable mapd_web_server
Checkpoint
To verify that all systems are go, load some sample data, perform a mapdql query, and generate a Table chart using Immerse.
OmniSci ships with two sample datasets of airline flight information collected in 2008. To install the sample data, run the following command.
cd $MAPD_PATH
sudo ./insert_sample_data
When prompted, choose whether to insert dataset 1 (7 million rows) or dataset 2 (10 thousand rows). The examples below use the smaller 10 thousand row dataset.
Enter dataset number to download, or 'q' to quit:
#     Dataset           Rows    Table Name          File Name
1)    Flights (2008)    7M      flights_2008_7M     flights_2008_7M.tar.gz
2)    Flights (2008)    10k     flights_2008_10k    flights_2008_10k.tar.gz
Connect to OmniSci Core by entering the following command in a terminal on the host machine (default password is HyperInteractive):
$MAPD_PATH/bin/mapdql
password: ••••••••••••••••
Enter a SQL query such as the following:
mapdql> SELECT origin_city AS "Origin", dest_city AS "Destination", AVG(airtime) AS
"Average Airtime" FROM flights_2008_10k WHERE distance < 175 GROUP BY origin_city,
dest_city;
The results should be similar to the results below.
Origin|Destination|Average Airtime
Austin|Houston|33.055556
Norfolk|Baltimore|36.071429
Ft. Myers|Orlando|28.666667
Orlando|Ft. Myers|32.583333
Houston|Austin|29.611111
Baltimore|Norfolk|31.714286
Connect to Immerse using a web browser connected to your host machine on port 9092. For example, http://omnisci.mycompany.com:9092.
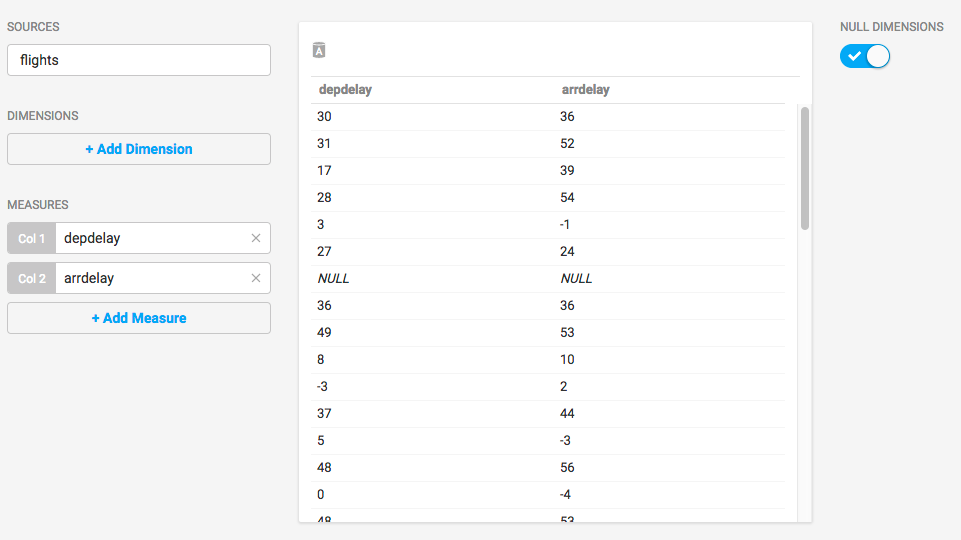
Create a new dashboard and a Table chart.
- Click New Dashboard.
- Click Add Chart. Table is the default chart type.
- Click Add Data Source.
- Choose the flights_2008_10k table as the datasource.
- Click Add Measure.
- Choose depdelay.
- Click Add Measure.
- Choose arrdelay.
The resulting chart shows, unsurprisingly, that there is a correlation between departure delay and arrival delay.